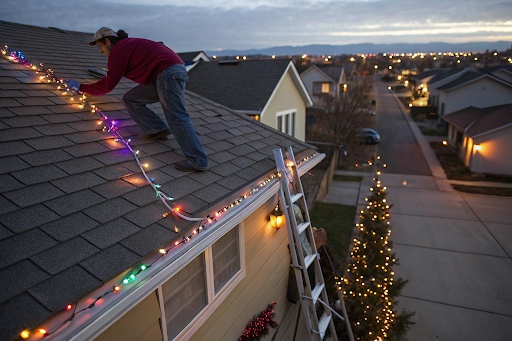
Nothing marks the beginning of the holiday season like the magical glow of Christmas lights on rooftops. Whether you're aiming to create a winter wonderland or simply want to highlight your home's architecture, properly installing Christmas lights on your roof can make all the difference. This guide provides a comprehensive, step-by-step process to ensure a safe, effective, and visually stunning installation.
Understanding Your Roof Type and Lighting Needs
Before jumping into the installation process, it's important to assess the type of roof you're working with and plan the layout accordingly. Different roofs require different approaches to ensure safety and effectiveness.
| Roof Type | Lighting Considerations |
|---|---|
| Asphalt Shingles | Gentle handling; compatible with most light clips. |
| Clay Tile Roof | Avoid pressure; use clips that do not wedge under tiles. |
| Metal Roof | Magnetic clips may be used; ensure rust-proof lights. |
| Flat Roofs | Use light stakes or adhesive clips on the perimeter. |
| Steep or High Rooflines | Exercise extreme caution; consider hiring a professional or using a bucket lift. |
Tip: Always test your lights before hanging to avoid rework later.
Tools and Materials You’ll Need
To ensure a smooth installation, gather the following items:
- Christmas lights (LED or incandescent lights, depending on your preference)
- Plastic roof clips (non-damaging and easy to use)
- Ladder or bucket lift (depending on roof height)
- Zip cords and outdoor-rated extension cords
- Timer or smart plug for power control
- Outdoor power outlet or weatherproof battery box
- Electrical tape or weather-resistant connectors
Step-by-Step: Hanging Christmas Lights on Roof
1. Measure the Roofline
Start by measuring the perimeter of your roofline, including eaves, gables, and any dormers. Don’t forget the roof peak if you plan to outline it.
Chart: Suggested Light Quantities Based on Roof Size
| Roofline Length (Feet) | Number of Bulbs (9" spacing) | Number of Bulbs (12" spacing) |
|---|---|---|
| 50 ft | 67 | 50 |
| 100 ft | 133 | 100 |
| 150 ft | 200 | 150 |
2. Choose the Right Christmas Lights
- LED lights: Long-lasting, energy-efficient, safer due to lower heat.
- Incandescent lights: Provide a traditional warm glow, but consume more energy.
- Rope lights and icicle lights: Great for outlining eaves and creating a festive display.
- String lights: Versatile for both rooftop and holiday decorations.
Note: Choose light strings based on your desired display type—linear, cascading, or shaped.
3. Install Light Clips
Use plastic clips designed specifically for the type of roofing material you have:
- Shingles: Clip between shingles without lifting or damaging them.
- Gutters: Use gutter hooks that wrap without puncturing.
- Tile Roof: Use non-invasive adhesive clips.
Important: Plastic clips are the easiest and safest way to hang Christmas lights on the roof.
Safety First: Preventing Hazards
- Always use a safety ladder or work with a helper.
- Plug lights into a grounded outdoor power outlet.
- Use power timers to reduce risk and energy usage.
- Avoid overloading a single outlet; use multiple zip cords or circuit breakers if needed.
- Secure all cords away from water or ice paths.
Light Styles and Color Themes
Matching your home’s aesthetic is key to a cohesive Christmas decorating plan.
| Light Style | Best For |
|---|---|
| Warm white LEDs | Traditional Christmas tree lights |
| Multicolor bulbs | Playful, family-friendly holiday display |
| Rope lights | Outlining roof edges, windows, and walkways |
| Icicle lights | Hanging from gutters or roofline |
| Mini lights | Tree lights, shrubbery, and railings |
Consider accenting your roofline decorations with a central piece—such as a large bulb light display or a lit gingerbread house setup.
Decorative Ideas for Different Roof Styles
- Flat Roof: Line perimeter with rope lights or light stakes.
- High-pitched roofs: Consider hiring a pro or using a light-hanging pole.
- Gabled roofs: Use roofline lights to enhance architectural lines.
- Multi-level roofs: Plan transitions between rooflines for a seamless light display look.
Maintaining Your Lights Throughout the Season
- Check regularly for blown bulbs.
- Replace broken or dimming LED bulbs quickly.
- Store extra lights for mid-season fixes.
- Keep connectors dry and off the ground.
- Turn off power during storms or snowfall.
Creating a Cohesive Outdoor Display
- Coordinate colors with your Christmas tree indoors.
- Use matching or complementary rope lights on walkways.
- Add window lighting or door frames wrapped with string lights.
- Install a focal light display such as a thoughtful Christmas display or a huge gingerbread house.
End of Season: Safe Removal and Storage
- Unplug and remove all lights using a ladder or pole.
- Gently remove clips and avoid tugging on light strings.
- Store lights in a bucket or organized container to prevent tangles.
- Label strands by area (roofline, windows, tree, etc.) for next year.
Final Thoughts
The holiday season is the perfect time to showcase your home with beautiful Christmas lights. Whether you're decorating a simple one-story bungalow or a multi-level home with a shingled roof, a well-thought-out lighting plan will elevate your Christmas spirit.
Pay close attention to safety, use the right tools and clips that are specifically designed to hang Christmas lights, and plan your roofline lighting layout in advance.
By following these tips, you can turn your home into a dazzling centerpiece of your neighborhood’s festive rooftop decor.
For expert services, check out:
- Christmas lights installation Vancouver
- Christmas light installation Portland
- Christmas light installation Washington
Professionals in these regions offer custom Christmas light services for a brighter display that lasts the entire holiday season.